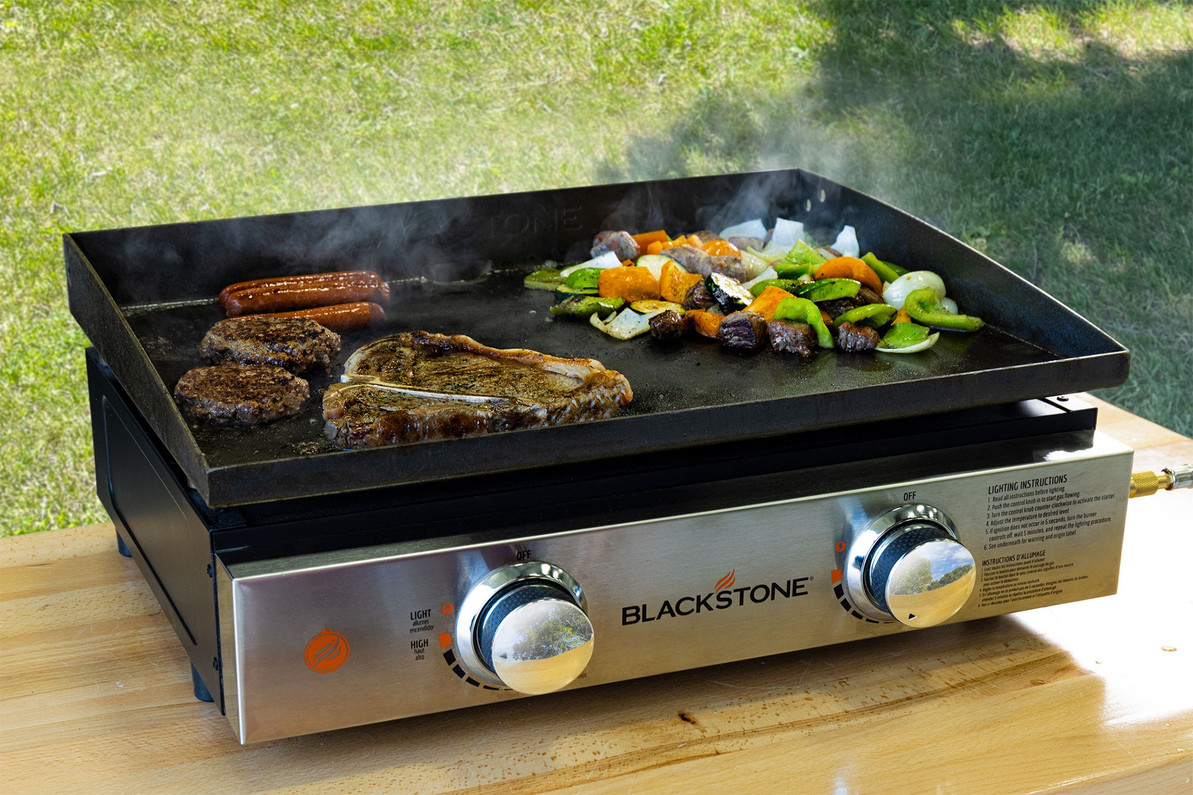
4 Meal Ideas to Break In Your Tabletop Griddle
If you’ve walked around an RV park lately, you likely noticed at least one person cooking outside on a flat top grill, probably more. While griddles have been commonplace in diners and restaurants, they are a relatively new trend for outdoor enthusiasts.
The flat-top design provides a great deal of cooking space and often multiple temperature controls, which makes cooking different foods at one time easier. This also means less clean-up at your campsite. Both electric and propane-powered options are available, but many campers choose one that runs on propane because access to electricity may be limited.
If you’ve recently become the new owner of a tabletop griddle, you’re probably excited to get cooking but may be wondering where to start. In this article, I’ve shared a few of my favorite meals to cook on the flat-top, which are quick and easy but oh so tasty! You can pick up many of these items at your local grocery store, but if you prefer, you can also make everything from scratch. For example, you can buy pre-made pancake mix or make your own. The same goes for the pork carnitas. I have tried in the past to make pork carnitas from scratch but found that the pre-packaged version was just as good but much quicker and cheaper overall. These are not step-by-step recipes but an overview of cooking directions and helpful tips and techniques to get acquainted with your new flat-top griddle.
Griddle Prep
Tabletop griddles are typically made from cold-rolled steel material, so they require a bit of prep-work before cooking. This process is pretty much the same as a cast-iron pan. The surface must be seasoned and properly cleaned to develop and maintain a non-stick cooking surface. Before using your griddle for the first time, check out the video below for a detailed description of how to season your new flat top.
Diner-Style Breakfast
When I think of a flat-top griddle, the first thing that comes to mind is diner food. I remember sitting at the counter as a kid and watching in awe as the cook whipped up full breakfasts on a large flat-top grill. If you want to show off your new griddle, cooking a delicious diner-style breakfast is the way to go.
Ingredients

- Cooking oil
- Eggs
- Hashbrowns
- Butter
- Seasoned salt
- Sausage Links
- Pancakes
Serving Suggestions & Helpful Tips
Producing the perfect diner-style breakfast is all about timing and technique. If you cook the eggs first, they will be cold by the time your potatoes are done and you’ll miss out on a nice golden-brown crust if you try to rush the potatoes. If you wait until the last minute to make your pancake batter, they will turn out flat and doughy instead of light and airy.
- Start by making your pancake mix. It should rest for at least 10 minutes so that the flour has time to absorb the liquid, which is the key to lighter, fluffier pancakes. This goes for whether you are making pancakes from scratch or an instant mix.
- If you are having scrambled eggs, prepare those now so that they can be quickly added to the griddle when it is time. Fried eggs can be cracked directly onto the flat top later but be careful not to drop a shell!
- Hashbrowns will take the longest to cook, so those should be the first thing going on your griddle, and it should be hot when you put them on! Preheat your griddle to medium-high heat. I recommend using the packaged hashbrowns available in the refrigerated section, but frozen or homemade will also work. Cooking times may vary depending on the type of hashbrowns you choose. Once your griddle is preheated, drizzle a couple of tablespoons of cooking oil onto the flat top. Wait until the oil is shimmering but not smoking to add your potatoes in a thin layer to your griddle. Remember that you still have quite a few things going on there, so space things out wisely. At this point, I toss a pat or 2 of butter and seasoned salt over my potatoes. You should only flip your hashbrowns once, so be sure to wait until they are at the level of crispiness you desire before flipping. I usually start checking my hashbrowns after 4 minutes.
- After starting your hashbrowns, the sausage links are the next item to cook. These will take about 5-6 minutes to cook and need to be turned every so often for even cooking. Keep an eye on these so they don’t burn.
- It’s pancake time! Prep the griddle surface with a small amount of cooking oil and begin pouring your pancake batter. Each pancake will use about ¼ cup of batter, a little more if you want bigger pancakes. Your pancakes will be ready to flip once the edges begin to dry out and little bubbles appear and pop on the surface.
- Last but not least, it’s time to cook the eggs. I like scrambled with this particular spread, but you can choose whichever style you prefer. Turn your griddle down before adding your eggs. Everything else should be finished or nearly finished cooking at this time and will just be staying warm on the grill. Eggs should be cooked using a lower temperature.
- Plate everything up and enjoy!
Pork Carnitas Tacos
These simple-to-make pork carnitas tacos are taken to the next level with the addition of a mojo marinade. Cooking this meal on a flat-top grill results in little bits of crispiness on the pork and nice crunchy taco shells.

Ingredients
- Pork carnitas (homemade or pre-packaged, I use Del Real Foods pork carnitas)
- Corn tortillas
- Toppings - white onion, cilantro, lime
- Optional but highly recommended: Mojo marinade and reserved bacon fat
Serving Suggestions & Helpful Tips
- Prep your toppings - dice the onion, chop the cilantro, and cut your lime into 1/8s
- Preheat your griddle to medium-high heat. You will be heating the taco meat and frying up your tortillas simultaneously.
- If you choose to use the pre-packaged pork carnitas, I highly recommend using mojo marinade instead of water as the directions call for when reheating. Mojo is a garlicky, citrusy marinade that adds extra flavor to the carnitas and ensures they are nice and juicy - it’s a real game-changer and is available at most grocery stores. You’ll simply toss the carnitas on the flat-top and sprinkle about a ⅓ of a cup of mojo directly on top. Flip/stir up the carnitas every couple of minutes as they cook.
- Frying the corn tortillas may take longer than you think but trust me, they are worth the time. I recommend using leftover bacon grease to fry your corn tortillas, but any cooking oil will work. Drop some bacon grease on the griddle and as it melts, toss a corn tortilla on top and move it around a bit to absorb some of the oil (this keeps it from drying out and falling apart). Let it fry until the color changes to a light golden brown, about 4 minutes, then brush a bit more bacon grease on top and flip.
- The taco shells are best the moment they come off the griddle, so I recommend serving those as soon as they are ready. You’ll probably have to fry up a few rounds of tortillas anyway because you’ll want seconds!
Smash Burgers
You can’t own a flat-top griddle and not make smash burgers at some point. These are a staple because you really can’t make smash burgers on anything else. As the name states, you will need to smash these burgers, so you’ll need either a grill press or a solid spatula that won’t bend when you push down on the patty.

Ingredients
- 80/20 ground chuck
- American cheese
- Potato rolls
- Butter
- Additional toppings of your choice (I recommend caramelized onions)
Serving Suggestions & Helpful Tips
- Begin by dividing the meat into individual patties. Whip out the kitchen scale for these because each one should be as close to a ¼ pound as possible. You’ll be flattening these later on the grill, so leave each patty as a loosely-formed ball for now.
- Preheat your griddle to medium-high heat.
- Once the griddle is hot, place butter on the surface, then immediately add the burger meat one at a time, smashing each one flat with your spatula. If the butter is alone on the hot surface for too long, it will burn and leave an unpleasant taste, but it helps prevent the burger from sticking too bad.
- Cook burgers for 3-5 minutes, flipping when the bottom side of the burger is crisp and cooked. Place a slice of cheese on top of each burger after flipping and cook for 3 minutes.
- Butter your rolls and place them on the flat top for a quick toast. The burgers should be ready around the time your burgers are finished cooking.
- Assemble your burgers with 2-3 patties per bun. Enjoy!
Philly Cheesesteaks
A good Philly cheesesteak sandwich is one of the hardest things to find, that is unless you know how to make it yourself. If you’ve never made one, don’t get discouraged because your new flat-top griddle is perfect for cooking Philly cheesesteaks!

Ingredients
- Shaved or thinly sliced ribeye
- Green bell pepper, sliced
- White onion, sliced
- Olive oil
- Provolone cheese (or CheeseWhiz if you’re looking for authenticity)
- Hoagie rolls
- Butter
- Salt and pepper to taste
Serving Suggestions & Helpful Tips
You will need two metal spatulas for this recipe. The spatulas will allow you to chop up the meat and mix everything at the end, so they should be sturdy enough to do so.
- Preheat your griddle to medium-high heat to pre-cook your peppers and onions. Once the griddle is warm, drizzle a bit of cooking oil and a tablespoon of butter onto the flat top, then add the peppers and onions. Stir frequently until the onions and peppers are softened and beginning to caramelize. Remove from heat and store off to the side while you cook the meat.
- Add another drizzle of cooking oil, then place your shaved ribeye on the grill. As it begins to cook, use the two spatulas to chop up the meat, so it cooks more evenly.
- As the meat finishes, divide into piles for however many sandwiches you will be making. Add cooked peppers and onions to the pile, then top with cheese.
- Butter your sandwich rolls and place them on the grill top for a quick toast; you’ll be needing them any second.
- With your two spatulas, mix up each meat pile, then place directly in a freshly toasted bun.
- Enjoy!
If you still need to get a tabletop griddle, check out Rec Pro’s selection today so that you can try these meal ideas ASAP, and let us know what you think! Happy grilling!
Recent Posts
-
Traveling to the RV Hall of Fame in Elkhart, IN
If you are traveling to Elkhart, IN to see the RV Hall of Fame, getting off the toll road at exit 96 …Nov 14, 2025 -
Best RV Air Conditioners of 2025: An Expert Guide From RecPro
Quick Answers Best overall RV air conditioner: RecPro 15K Quiet AC with Heat Pump (RP-AC3800) Best f …Oct 29, 2025 -
The Nuclear Nomads Expand Sofa with New Recliner Section Install
The Nuclear Nomads are a full time RV family living in south Florida. Andi and Joey value quality ti …Oct 24, 2025 -
Trailer Wiring Guide: How to Wire Your Trailer for Safety and Efficiency
Table of Contents 1. Common Types of Trailer Connectors 2. Trailer Wiring Diagrams: Color Codes and …Aug 20, 2024 -
How to Keep Your Pets Safe While Camping
RVing and camping are a great getaway from the hustle and bustle of work and the city and the day-to …Jul 02, 2024 -
Why Replace Your RV Furniture?
You may wonder when is the best time to replace your RV furniture. There is no one right answer to t …May 20, 2024


